Terrain Rules and Terrain Painting
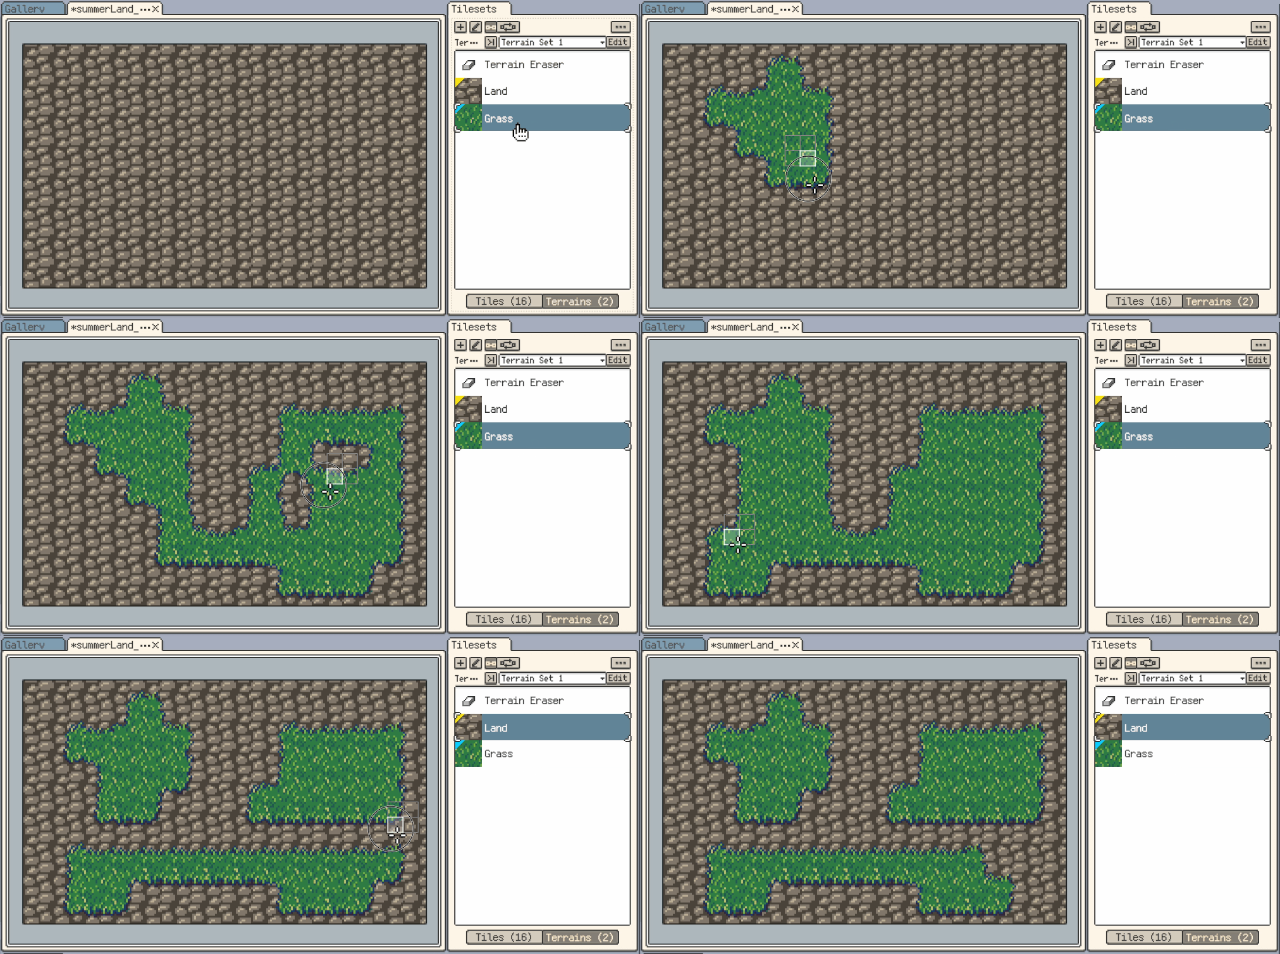
Terrain is designed for painting tiles that need to adjust their connections automatically based on surrounding cells, such as ground, shorelines, roads, and walls. When painting with regular tiles, each action places the selected tile directly. When painting terrain, you specify the terrain state of a cell, and Resprite selects an appropriate tile based on neighboring cells and the rules in the tileset.
Terrain rules belong to a tileset, while terrain painting takes place on a tilemap layer that uses that tileset. Before configuring terrain, we recommend learning the basics of Tilesets and Tilemaps.
Supported Tilemap Types
Terrain rules support rectangular and isometric tilemap layers. Hexagonal tilemap layers do not support terrain rules.
Tilesets and tilemaps are available starting from DA 1.32.0 and iOS R59. If the relevant commands are not available in your current version, update Resprite first.
Core Concepts
Terrain Set
A terrain set is a group of terrains that use the same rule mode. A tileset can contain multiple terrain sets, each with its own terrains and tile rules.
The terrain set mode determines which positions on a tile can be marked with rules. You choose the mode when creating the terrain set. To use a different mode, create a new terrain set and configure its rules for that mode.
Terrain
A terrain is a specific category within a terrain set, such as grass, road, or water. A terrain set can contain one or more terrains, and different rule positions on the same tile can be assigned to different terrains to describe boundaries and connections between them.
Each terrain can have a name, display color, and optional representative tile:
- Name identifies the terrain in the terrain list.
- Color identifies the terrain in the rule overlay and when no representative tile is set.
- Representative tile provides a preview in the list, making the terrain easier to identify.
The name, color, and representative tile do not replace rule markings. Matching is still determined by the terrain rules assigned to each corner or edge of a tile.
Rule Positions
A rule position indicates which terrain a corner or edge of a tile belongs to. When painting terrain, Resprite evaluates the terrain states of the target cell and surrounding cells, then selects a tile with matching rules.
An unset rule position has no terrain marking. Erase Terrain removes an existing marking and returns that position to the unset state.
Choose a Terrain Set Mode
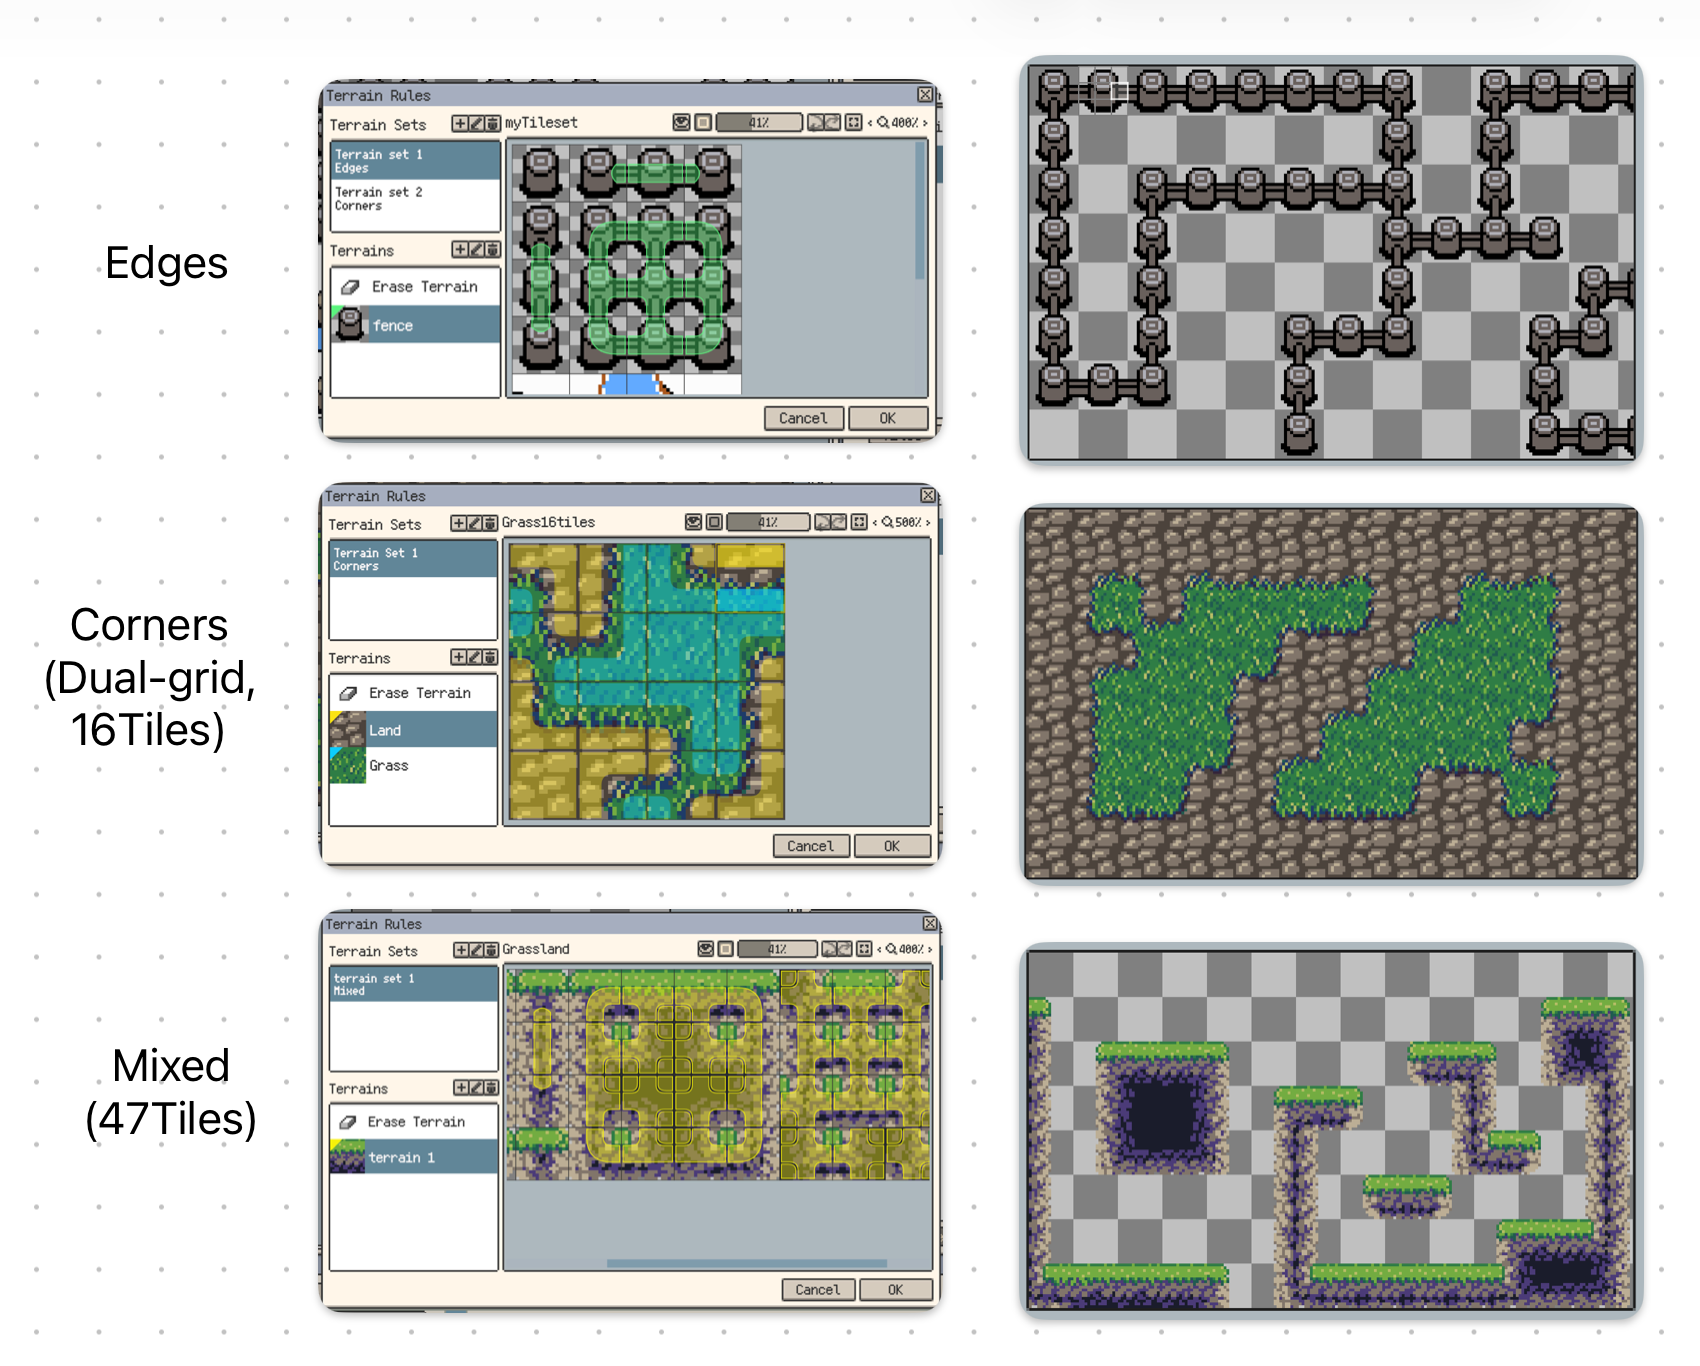
Resprite provides three terrain set modes: Corner, Edge, and Mixed.
| Mode | Available rule positions | When to use it |
|---|---|---|
| Corner | Top-left, top-right, bottom-right, and bottom-left corners | Use when the relationship between tiles is primarily expressed by combinations of corners. |
| Edge | Top, right, bottom, and left edges | Use when connections are primarily expressed by whether adjacent edges meet. |
| Mixed | All four corners and all four edges | Use when the artwork depends on both corner and edge information. |
The mode describes the rule structure, not a level of complexity or quality. Mixed mode requires rules for more positions and should only be used when the artwork actually needs to represent both corners and edges.
Create Terrain Rules
Before configuring terrain rules, make sure the tileset is divided correctly and contains the required straight, edge, corner, and connection tiles.
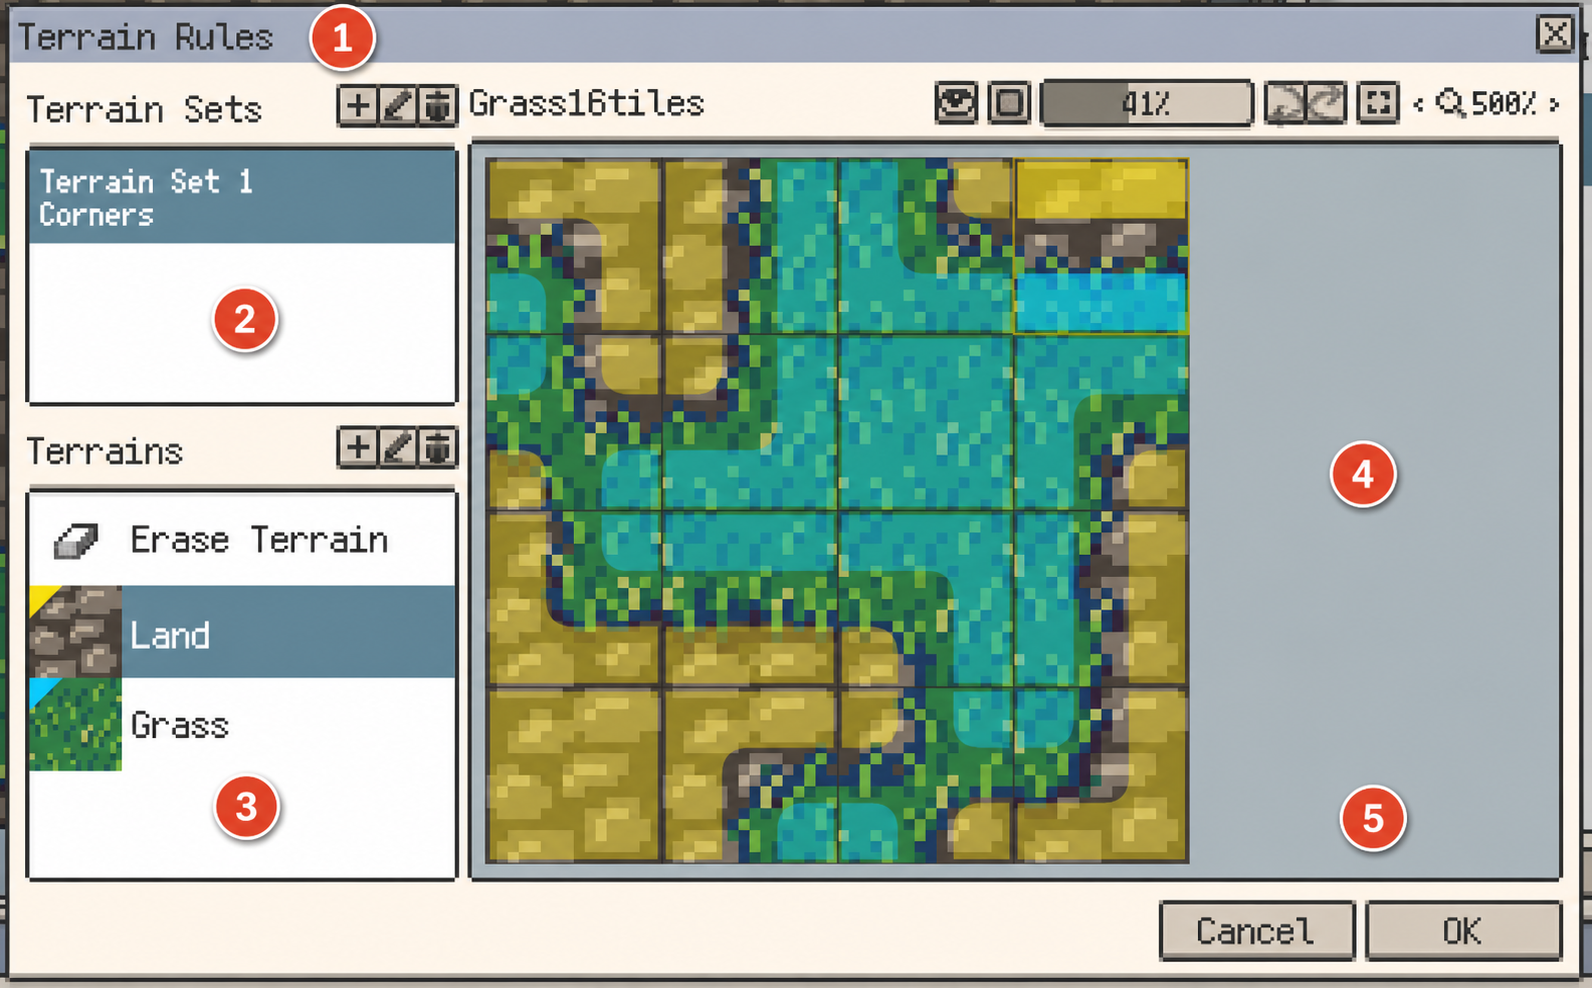
The basic workflow is shown below. The numbers in the image correspond to these steps:
- Open the rules editor: Select the target tileset in the Tilesets panel, then choose Tileset ▸ Edit Terrain Rules. You can also choose Edit in the Terrains section.
- Create a terrain set: Add a terrain set, enter a name, and choose Corner, Edge, or Mixed mode.
- Add terrains: Add one or more terrains, then set their names, display colors, and representative tiles as needed.
- Configure and inspect rules: Select the terrain to edit, mark rule positions on the tileset at the right, and inspect the result with the rule overlay.
- Save the changes: After confirming that the rules are correct, choose OK.
All terrains in the same terrain set share the set's mode. For example, Edge mode only allows the four edges of a tile to be edited and does not show corner positions. Mixed mode allows corners and edges to be edited separately.
Edit and Inspect Rules
After selecting a terrain, click or drag across the tileset to mark multiple rule positions continuously. Positions that are not supported by the current mode are not modified.
The rules editor provides these common operations:
- Draw rules: Select a terrain, then click or drag on valid corners or edges of the tiles.
- Erase rules: Select Erase Terrain, then click or drag across the positions to clear.
- Sample rules: Right-click an existing marking on desktop, or touch and hold on mobile. Sampling selects the corresponding terrain; sampling a position without a terrain marking selects the erase state.
- Show the overlay: Hide or show the rule overlay, and adjust its outline and fill opacity.
- Undo and redo: Undo or redo changes made within the rules editor.
- View the tileset: Zoom the tileset or fit it to the current view to inspect small rule positions.
Changes made in the rules editor are first stored in the current editing draft. Choose OK to apply the changes or Cancel to discard the current edit. If you close the window with unsaved changes, Resprite asks whether to save them.
Understand the Overlay
The overlay uses each terrain's display color to show which rule positions have been assigned on every tile. When inspecting the rules, check that:
- tiles in the same connection group use a consistent terrain;
- corners, straight sections, endpoints, and intersections have the correct positions marked;
- positions that do not belong to any terrain remain unset;
- markings on both sides of a boundary reflect the intended connection when multiple terrains meet.
The representative tile only affects the list preview. A terrain can still participate in matching without a representative tile as long as its rules are complete.
Rule Coverage and Matching Results
Terrain painting does not create connection types that are missing from the tileset. The available results depend on the tiles that actually exist in the tileset and the rule combinations that have been configured.
If an edge, corner, or connection type is missing, Resprite has fewer candidate tiles to choose from and the result may not match the intended structure. When a result looks incorrect, check the following first:
- The terrain set mode matches the rule structure of the artwork.
- The required connection tile actually exists in the tileset.
- The tile's corner or edge markings are complete.
- Neighboring positions do not use the wrong terrain or contain unnecessary markings.
Multiple candidate tiles can use the same rule combination. This makes it possible to provide visual variations for the same type of area while keeping its connections correct.
Paint Terrain on a Tilemap Layer
After saving the rules, return to the Tilesets panel to use the terrain:
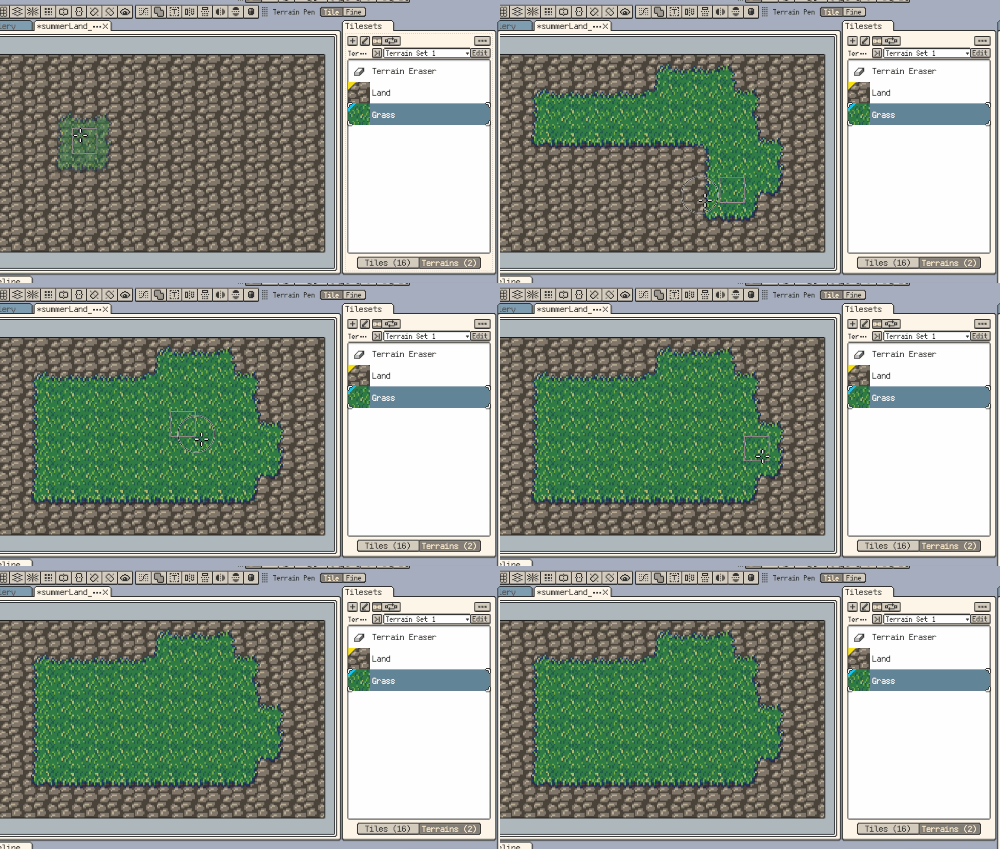
- Select a rectangular or isometric tilemap layer that uses the tileset.
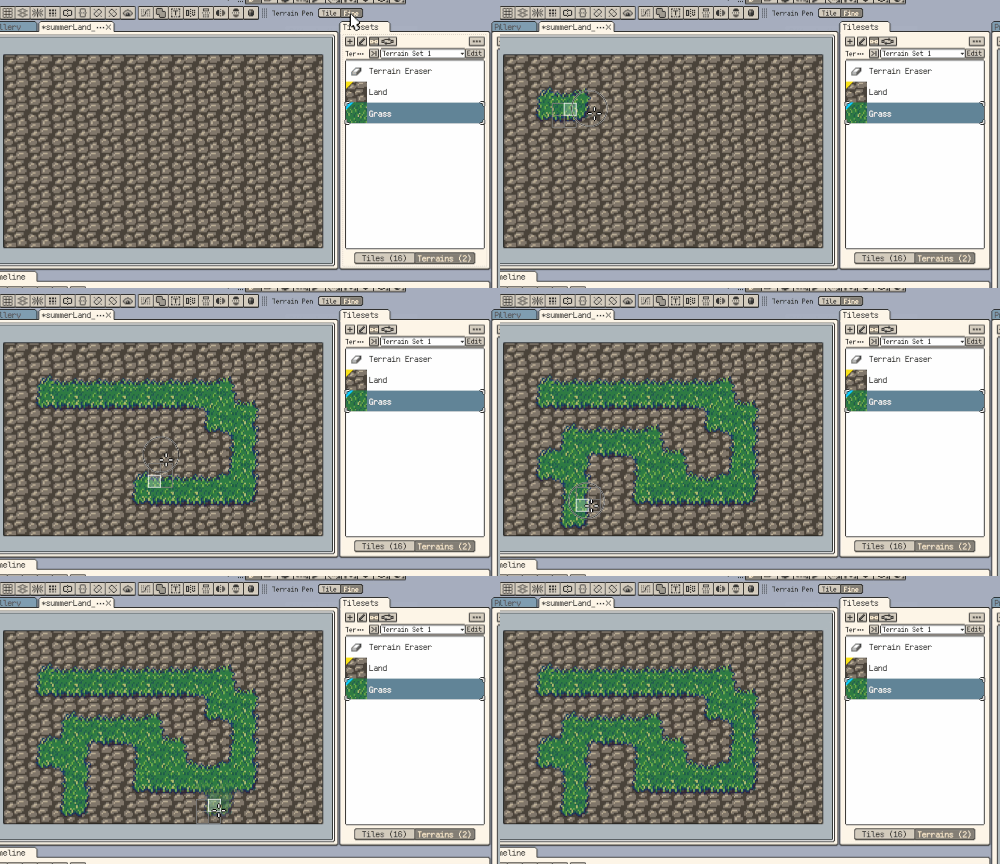
- Open the Terrain tab in the Tilesets panel.
- Select the target terrain.
- Paint on the canvas with the Pencil tool.
After you select a terrain, the Pencil tool works as a terrain brush. Whenever you change the terrain state of a cell, Resprite recalculates the matching result for that cell and nearby affected positions, so surrounding tiles may also update.
Tile and Fine Modes
The terrain brush provides two target modes:
- Tile: Applies terrain to the entire cell, suitable for painting larger continuous areas.
- Fine: Changes only the edge or corner under the pointer, suitable for correcting a local connection.
The effective target in Fine mode depends on the terrain set mode: Corner mode changes corners, Edge mode changes edges, and Mixed mode can change either corners or edges.
Select Terrain Eraser in the terrain list of the Tilesets panel to clear terrain states at the target positions. After terrain is erased, nearby affected tiles are matched again using the remaining states.
The Eyedropper tool can sample an existing terrain result on the canvas so you can continue painting with the same terrain.
Frequently Asked Questions
-
I cannot paint after selecting a terrain
Make sure the current layer is a rectangular or isometric tilemap layer that uses the corresponding tileset, and that the selected terrain has usable rules. Regular pixel layers and hexagonal tilemap layers cannot use terrain rule painting.
-
An edge or corner does not produce the expected result
Check that the tileset contains the required connection tile and that the corner and edge markings in the rule overlay are complete. An unsuitable mode or an incorrectly marked position can also cause the candidate tiles to differ from the intended result.
-
Surrounding tiles change when I modify one cell
This is expected terrain-matching behavior. When a connection condition changes between neighboring cells, Resprite selects new tiles for the affected positions to keep the rules consistent.
-
The overlay obscures tile details
Temporarily hide the rule overlay, or adjust its fill opacity and outline. Hiding the overlay does not remove any configured rules.
-
I need to use a different terrain set mode
The mode determines which rule positions are available. To change from Corner to Edge or Mixed, create a new terrain set and mark the rules again for the target mode.
Example Files
Visit Example Files to browse and download official Resprite project examples.